
|
This page is an After the Flash Wiki guideline. It covers the standards of conduct, policies, as well as writing etiquette that all users must follow. |
The writer's guide is the official guide for writing up articles on the wiki.
Foreword
This step-by-step guide covers most of the basics behind writing a new page on this wiki from scratch. It is highly recommended for new users interested in writing pages for the wiki to read this guide to get familiarised with the way that the ATF wiki operates.
Throughout this guide, you will learn about the thought processes behind page layouts, formatting, as well as some fundamental concepts of writing that will help you to create content on this wiki.
Getting started
Creating a page
Before you start writing, it is always recommended that you first read and get yourself familiarised with the ATF Wiki's Manual of Style as well as basic wiki policies such as "What the ATF Wiki is not".
In order to create a new page, look for the "Add new page" button in the top right of the top navigation bar on your screen.
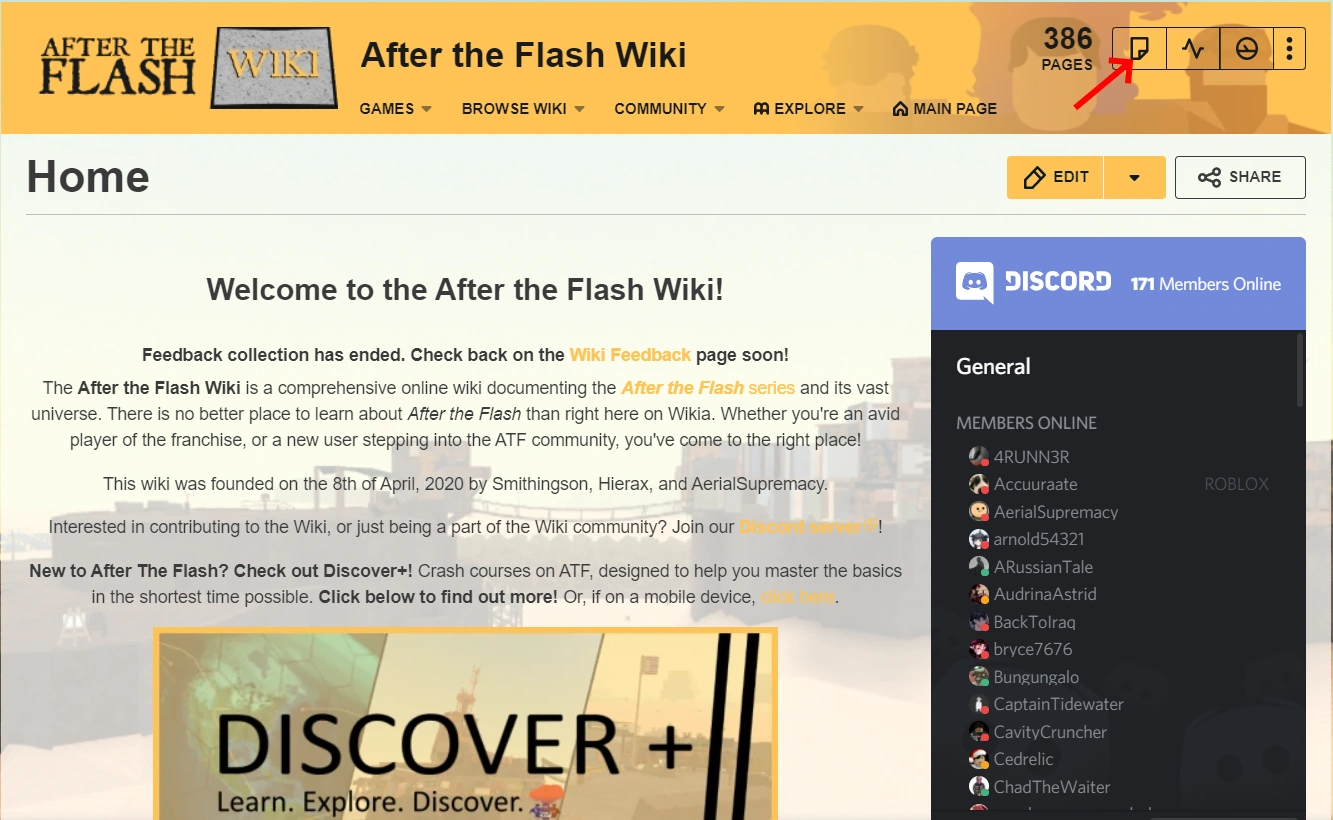
Once you click on "Add new page", you will be presented with a menu asking you to enter your article name.
Enter your article name, ensure that is is consistent to the Manual of Style. (The page should be written in sentence case)
If you are writing a page of an item, faction, weapon, person or entity in a spinoff that already exists in canon: be sure to add (spinoff) or (title of spinoff game) or it will result in an ambiguation.
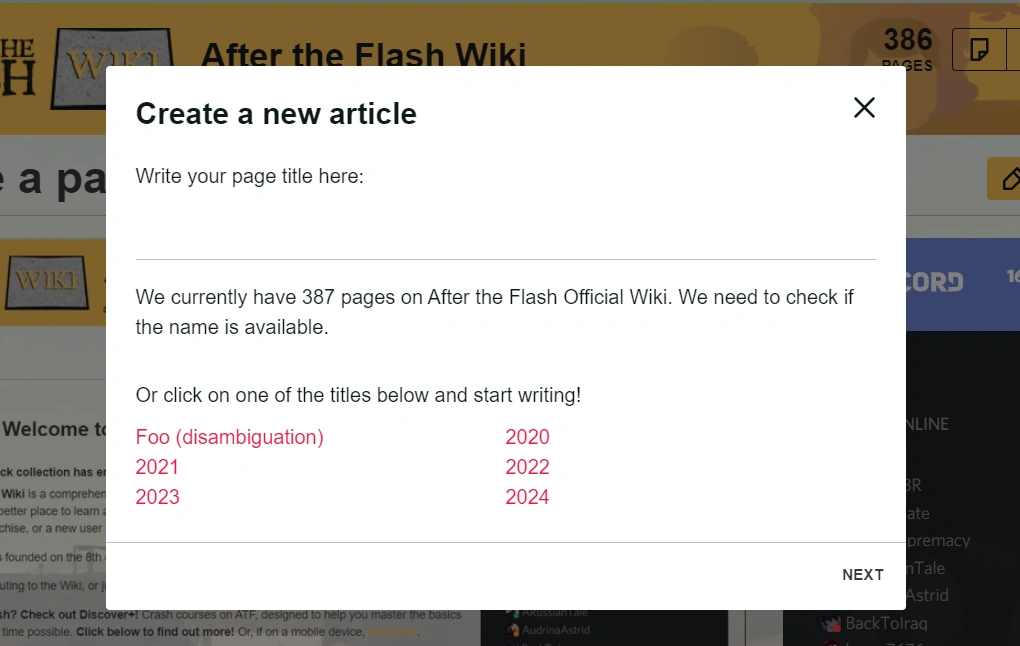
After entering your article name, click "NEXT" and you will be brought to the visual editor.
Setting up your page
On the After the Flash Wiki, it is important that articles on the site are neatly organized and easily accessible. In order to facilitate this for users, it is important that you set-up your page well.
Understanding which editor to use
On wikia, there are two main types of editing interfaces that you can use: visual mode, as well as editor mode. Both modes are unique in their own way and offer different advantages and writing experiences. It is important for writers to choose an editing interface to use, although there is no harm in using both. It all depends on user preference.
Switching between visual editing and source editing
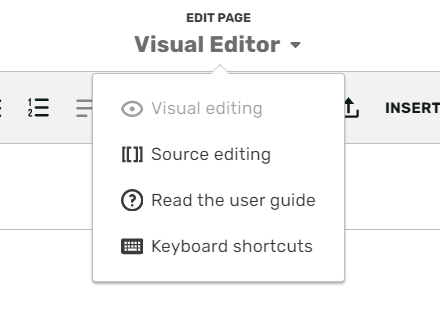
In order to switch between visual editing and source editing, scroll up to the top of your editor until you see either the words: "Visual Editor" or "Source Editor". Clicking on the words will open a dropdown menu which allows you to select between either visual editing or source editing mode.
Visual editing
Visual editing mode is the default editing mode on wikia. It is a straightforward and simple-to-use interface that is easy to learn. The visual editing mode is extremely similar to the editing mode in common computer applications such as Google Documents. It is highly recommended that beginners on new writers on the ATF Wiki first learn to write pages in the visual writing mode.
Visual editing has a few advantages and disadvantages:
Advantages:
- The interface is simple and easy to understand.
- Visual editing allows the user to see the actual layout of the page and changes on the page in real time.
- Visual editing does not require the user to know coding / computer programming.
Disadvantages:
- The visual editing interface is often buggy, and often clunky or even problematic to use.
- Visual editing is limited and does not accept source code.
Source editing
The source editor is an editing mode on wikia that allows the user to see the underlying source code of the wiki article. The source editing mode uses a markup language called Wikitext in order to format content on fandom. Source editing provides users that understand coding with generally more freedom and allows for more complex applications or functions to be built-into the article.
Like visual editing, source editing has its own set of advantages and disadvantages:
Advantages:
- More robust and less buggy than the visual editor
- Allows for the coding or invoking of functions into an article or page
Disadvantages:
- Steeper learning curve.
- It is harder to format and view the layout of pages than the visual editor.
Draftspace
Whenever a new page is created, it is to be immediately tagged and placed under draftspace. To summarize what draftspace is: it is category for unfinished pages that are works in progress. All newly created pages are to be placed under draftspace by default until they are completed. Unfinished pages that are not categorized under draftspace may be marked for deletion as part of general housekeeping policies. Tagging a page under draftspace can be done easily by adding a draftspace notice, which is a colored banner at the top of the page to indicate that it is incomplete or in the process of writing. A draftspace notice also automatically places your page in the draftspace category so that you do not need to manually add it via the categories tab.
Adding a draftspace notice can be done in either visual or source editing mode.
This is an example of what a draftspace notice looks like:
|
Hazardous materials, under construction! This article is in draftspace and is currently a work in progress. You can help by finishing any missing information. |
Adding a draftspace notice in visual editing mode
In visual editing mode, click on "INSERT" at the top navigation bar of your editor. A dropdown menu should appear. Select "Template", and then search for "Draftspace". Ensure that your text cursor is at the very top of your article to ensure that the notice is inserted at the top of your page, and then insert the template.
Adding a draftspace notice in source editing mode
At the very top of your article in the source editing mode, type in: {{Draftspace}}
If this is done correctly, you should see the notice at the top of the article when you either save your edit, or return to visual editing mode.
Page layout & formatting
After your page has been set-up and created, it is now time to begin writing content on your page. This section covers the key topics needed to laying out your page and writing a quality article on the wiki.
On the ATF Wiki, every article follows the same basic layout which can be broken down into 3 key components:
- Article pre-body
- Article body
- Appendices
Article introduction
The article introduction usually consists of a few elements, not all elements listed are a must to be included:
- Tophats, banners or alerts
- Hatnotes
- Short description
- Infoboxes
- Table of contents
General
Categories
Categories are the fundamental foundation for ease of navigation on the wiki. Articles on the wiki are organized into categories and subcategories, forming a 'navigation tree' that users are able to explore.
Subcategories are always connected to larger categories.
Categorizing your page in edit mode
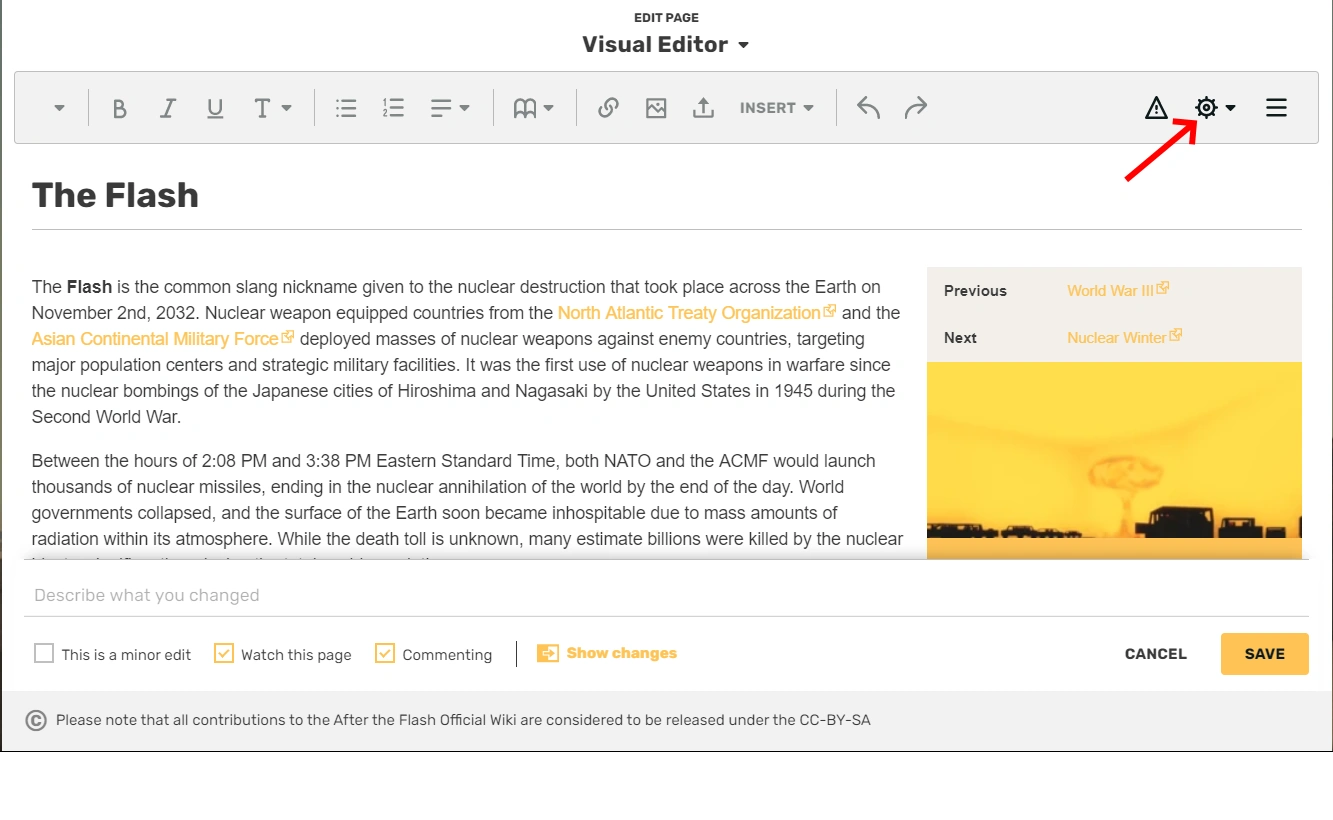
To add your article to a category in the visual editor, click on the gear at the top right of the visual editor. Doing so will open a drop-down menu, after that, click on "Categories".
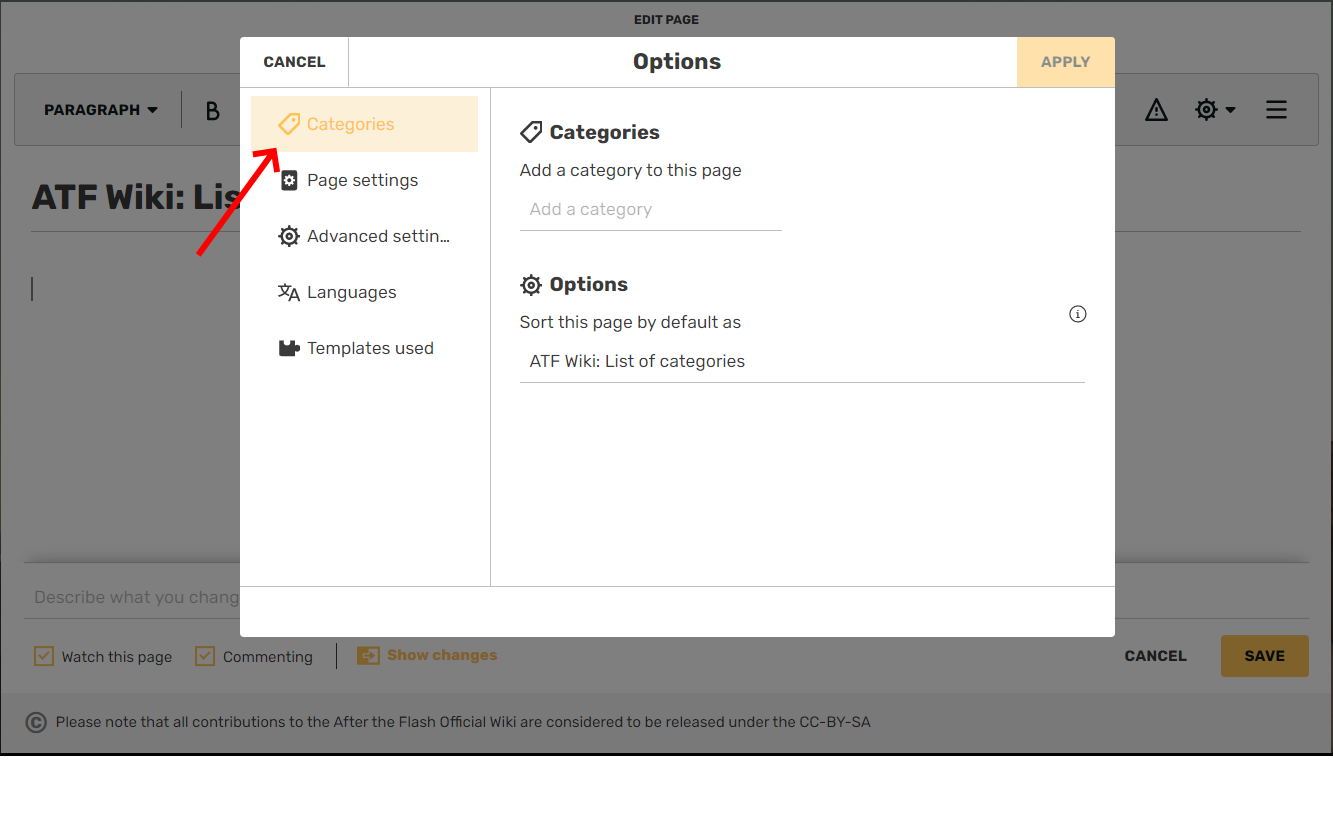
Clicking on "Categories" should bring you to this menu (shown below). Enter the categories you would like to group your article under and press enter for each category. In some cases, a dropdown menu of existing categories on the wiki may appear when you start typing. If an article category fitting your article topic already exists, then do not create a new category and add your article page to the existing category that fits your topic.
If you are unsure of what categories are present on this Wiki, please refer to this list.
Categorizing your page when not in edit mode
If you are not in edit mode: scroll down on your page until you see "ADD CATEGORY" at the bottom of your article.

Click on "ADD CATEGORY" and categorize your article accordingly to the topics pertaining to your article by typing out the category name, and then hitting enter. Sometimes, a dropdown menu of existing categories on the wiki may appear when you start typing. If an article category fitting your article topic already exists, then do not create a new category and add your article page to the existing category that fits your topic.
If you are unsure of what categories are present on this Wiki, please refer to this list.
Writing your page
1. Article pre-body
The article pre-body is one of, if not the most important segment of your entire article. It can be best described as a simple 1-2 paragraph long summary on the topic the page is supposed to cover. In the event that there is minimal information on the topic and the page is a stub, the article pre-body also doubles in purpose as the main article body.
According to the Manual of Style (MOS), the topic of the article should also be in bold.
A well written article pre-body should be:
- Clear and concise
- Easy to understand and read
- Relevant to the topic and informative
- Captures the reader's attention and piques their interest
- Answers the reader's basic questions on the topic. For example if the page was about the USCPF, the pre-body should be able to answer the basic question of: "What is the USCPF" with a simple, concise answer like: "The USCPF is a military, etc." followed by a brief elaboration.
Here is an example of a well written article pre-body in the context of a location:
"Cliffguard is a large scrap town in the Lake Mead Valley and serves as the region's largest population and trade center.
Built atop a mesa within the Badlands on the site of a former CDF refugee camp, the town sits along a key trade highway within the post-flash Southwestern United States linking the east to the west.
It is currently owned, governed, and defended by the Civilian Defense Front."
Although not necessary, it is possible to include the game that the topic of your choice appears in by appending a sentence to the end of the article pre-body.
Example:
"This location appears in After the Flash: Mirage."
2. Article body
The article body is the real meat-and-bones of the page. It covers the in-depth details of the topic that may/may not be present in the article pre-body. In the context of a faction page, an article body might consist of:
- History
- Organizational Structure
- Recruitment, etc
- Equipment
This list is not exhaustive.
It is very important to ensure that the page remains relevant and centered on the core topic at hand. For example: It is a common mistake for a page about Cliffguard to go on a tangent and ultimately wind up talking about the Civilian Defense Front. However, the page should only center on events and details centering around the town.
Recommended articles for reference
Here are some recommended articles that you may reference for writing for various topics.
Weapons: EM2416, Kitchen cleaver
Locations: Cliffguard
Factions: None at the moment.
Storyline or events: Bliss riots
Infoboxes
Infoboxes are an excellent way of spicing up a page. They are capable of storing and displaying information about the topic in a clean and organized manner. This also makes it convenient for the reader and piques their interest as crucial or basic information about the topic can be found in a glance, as opposed to sifting through walls of text to find what they are looking for.
Conclusion
Stick to these general writing rules, and your page should turn out just fine. If you have any further questions, feel free to approach our writing staff for information.